08. Creating a Slide Deck with Jupyter
Creating a Slide Deck with Jupyter
There are many ways in which you can use explanatory visualizations to convey findings to others. You might save your plots on their own, and embed them in a report or blog post. Visualizations also have a major place in presentations, as part of a slide deck. When it comes to creating slides, you might normally think of dedicated tools like Powerpoint, Keynote, or Google Slides. What you might not be aware of is the fact that Jupyter notebooks include a tool, nbconvert, that can export notebooks in an HTML slides format. The video below demonstrates a walkthrough of this:
Data Vis L6 C06 V1
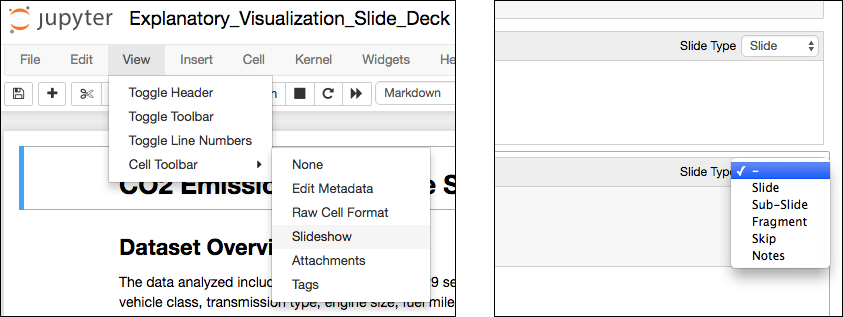
If you're planning on creating a slide deck presentation through a Jupyter notebook, it's a good idea to create a new notebook that is separate from your original, exploratory, work. This way, your explanatory work will be focused, and there will be fewer elements to categorize. To start, you need to categorize the type of slide element that each cell will correspond with. From the menu bar, select View > Cell Toolbar > Slideshow. You'll see a drop down appear in the upper right hand corner of each cell, from which you can assign slide element types.

Go to View > Cell Toolbar > Slideshow (left) to make the slide type dropdown show up on each cell (right).
For cells that you want readers to see, you'll choose the Slide, Sub-Slide, or Fragment types. Slides will form the main flow of the presentation, while sub-slides are children of slides in the main flow. Fragments are attached to preceding slides or sub-slides, and allow for gradual reveals of information on the same slide. It's a little hard to describe this abstractly through text: you can see an example of Slides, Sub-Slides, and Fragments at work through the example presentation found on the reveal.js homepage (the library that is behind the nbconvert slide functionality).
Cells that you don't want users to see should be in the Skip or Notes types. Skip-type cells will never show up in a slide flow, while Notes cells can only be seen by the presenter in a speaker notes window.
In addition to setting slide types, make sure that all of your code cells have been run and produce the output that you want to show. nbconvert will only export elements of the notebook as-is, and won't run the notebook cells as is. It is recommended that you use the Kernel > Restart & Run All menu option to do a clean run-through of all of your cells as a final preparatory action.
Once your notebook has been prepared, save it and shut down your notebook server. On the command line, you can render the notebook as slides using the following expression as a base.
jupyter nbconvert presentation.ipynb --to slidesHowever, it's likely that you'll want to add additional options to the nbconvert call to make the slides look cleaner and to make serving them easier.
By default, code cell inputs and outputs are both rendered in the slides. More likely than not, you'll want to hide the code in your presentation so that all attention can be put on the visualizations and text. To do this, you can specify a template file using the --template option. The template file available at this link and in the Resources at the bottom of this page, will hide code cells from nbconvert.
Additionally, running the base expression will not automatically open up the slide deck for viewing. In order to serve the slides, you would need to install a local copy of reveal.js (Installation documentation), make sure that your HTML slides point to the library correctly (using the --reveal-prefix option), and then start a local http server (e.g., via python -m http.server). Alternatively, you can add the --post serve option to your expression to make use of a public, online version of reveal.js, start up a server, and immediately open a tab in your web browser with the slide deck ready to navigate.
If you're at home with HTML, css, and web engine templating, then you have a lot of potential room for customizing your slide deck work. Otherwise, you can just use an expression like the following to get a basic slide deck up and running.
jupyter nbconvert presentation.ipynb --to slides --template output-toggle.tpl
--post serve